

Create a Learning Path
Step-by-step guide to filling in the Learning Path details form — title, cover image, difficulty, objectives, and more.
Create a Learning Path
Creating a learning path is a two-step process. First, you fill in the details form covered on this page. Then you use the Path Builder to add courses and publish.
Before you start
- You need the Admin role. The Learning Paths admin module is currently Admin-only.
- Have a title and at least one learning objective ready — these are required.
- You will need at least one Category already created (required field).
Step 1 — Open the create form
- In the sidebar, click Learning Paths.
- Click + Create New Path (top-right corner).
Step 2 — Fill in the details
Title (required)
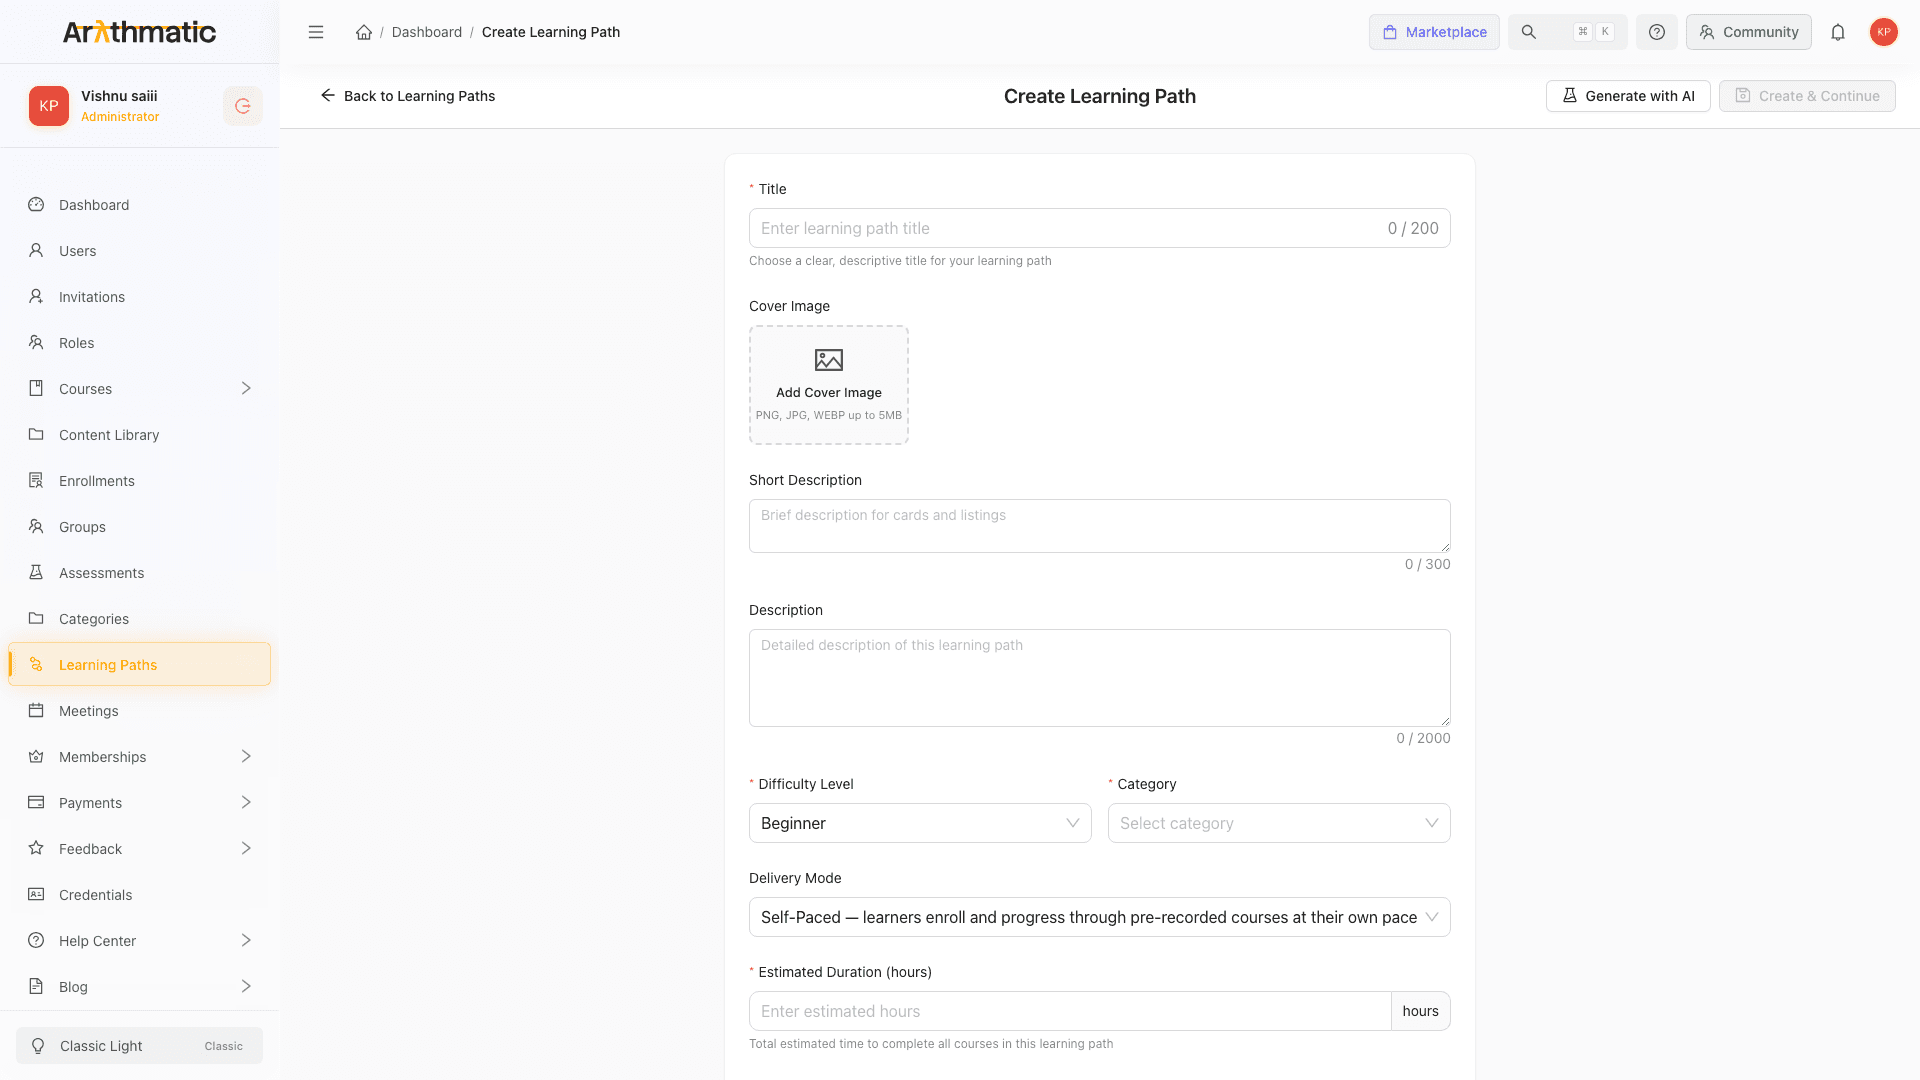
Enter a clear, descriptive title up to 200 characters. The title is shown on path cards, the learner catalog, and enrollment emails.
Validation:
- Minimum 3 characters.
- Cannot be whitespace only.
- Maximum 200 characters.
Cover Image
Upload a 16:9 image (PNG, JPG, or WEBP, up to 5 MB) that represents this path. It appears on path cards and the path detail page.
- Click the upload area or drag a file onto it.
- A preview appears immediately; click Remove to replace it.
Short Description
Up to 300 characters. Shown on catalog cards and listing pages. Keep it to one or two sentences — think of it as the subtitle.
Description
Up to 2,000 characters. Shown on the full path detail page. Use this for a richer overview: what the path covers, who it is for, and any prerequisites.
Difficulty Level (required)
Select the skill level this path targets:
| Option | Best for |
|---|---|
| Beginner | Learners with no prior experience |
| Intermediate | Learners with foundational knowledge |
| Advanced | Experienced learners deepening expertise |
| Expert | Practitioners at the top of their field |
Category (required)
Select the category this path belongs to. This determines where the path appears in the learner catalog. If you don't see the right category, ask an Admin to create one.
Delivery Mode
| Option | When to choose |
|---|---|
| Self-Paced | Learners enroll and work through the pre-recorded courses at their own schedule. Most common choice. |
| Cohort / Batch | Learners join a scheduled cohort with live classes. Progression can be gated by completion of the previous course. Configure cohorts from the path detail page — the Cohorts section appears for any batch-mode path, including Drafts. |
Estimated Duration (required)
Enter the total number of hours to complete all courses in this path. Duration is stored in whole hours, so enter a round number — fractional values (e.g. 0.5 h) are not persisted. Maximum 1,000 h.
After you add courses in the Path Builder, the builder detects when the sum of course durations differs from this value and shows an Update nudge you can click to sync automatically.
Learning Objectives (at least one required)
Add one bullet per line describing what learners will be able to do after completing this path. Examples:
- Build and deploy a REST API using Python and FastAPI
- Configure CI/CD pipelines with GitHub Actions
Click + Add Objective to add more rows. Click the trash icon to remove an empty or unwanted objective. At least one non-empty objective is required to save.
Feature this learning path
Check Feature this learning path to have this path appear in the Featured section of the learner homepage. Use sparingly — too many featured paths dilutes the effect.
Tags
Add free-text tags (press Enter after each one) to help with internal organization. Tags are stored with the path and shown on the path detail page, but they are not shown to learners in the current catalog and are not currently used for admin search or filtering (the admin search covers title and description only).
Step 3 — Create and continue
Click Create & Continue to save the path and go directly to the Path Builder where you will add courses and publish.
If validation fails, the form highlights the first field with an error and scrolls to it. Fix the highlighted fields and try again.
What happens next
Your path is created and, by default, saved in Published status (its is_active flag defaults to on), so it can appear to learners once it has courses. Unpublish it from the Path Builder if you want to keep it hidden while you build it out. From the Path Builder you will:
- Add courses to the path from your existing course catalog
- Set each course as Required or Optional
- Arrange the courses in the desired learning order
- Publish or unpublish the path as needed
See Path Builder for those steps.
Editing an existing path
From the Learning Paths list, click the ⋯ menu on any path card (grid view) or row (list view) and select Edit Path (or click the edit pencil). This opens the path detail page — it does not open the form directly. From the detail page, click Edit to open the details form pre-filled with the current values. Make your changes and click Save Changes.
AI generation
Click Generate with AI (top-right of the form) to have the AI suggest a title, description, duration, and learning objectives based on a topic you describe. Review and adjust the suggestions before saving — the AI output is a starting point, not a final draft.
Related
- Path Builder — add courses and publish
- Categories — create categories if needed
